Cheat Day! Fudgey Cheesecake Brownies


Let me tell you a little bit about cheat days. First being – they’re awesome.

Now, generally I live a pretty healthy lifestyle (Captain Obvious, anyone?). Lots of water-rich foods, lean proteins, very little saturated fats and carbs. But, just like every other red-blooded human being, I get cravings. And I don’t think that’s a bad thing!

It’s just science. If you absolutely, 100% restrict yourself from something you’re REALLY craving, it’s all you’ll think about. And then, by the time you give in, you’ll power through a basketball-sized bowl of Chicken Alfredo, feel like the blueberry girl from Willy Wonka, and your stomach will screaming “NOOOOOOOOOOOO!” with more emphasis than Luke Skywalker in the wait-you’re-my-daddy? scene.

I don’t take a cheat day every week, I only take one when it’s calling to me in extreme measures. And even so, I don’t go so far off the path that I can’t recover. For example, I’ll eat some pasta for lunch, and then have a really light dinner and x-nay on the desserts. Net net, when I do want something like, say, CREAM CHEESE BROWNIES, dammit, I’m gonna make ’em.

Now, I’m not completely sinful. I used Neufchatel Cheese instead of full fat cream cheese, because I never keep regular cream cheese in the house. Same goes for regular white sugar – I NEVER use it when I make things for myself, I prefer Coconut Palm Sugar which has a much lower Glycemic index. But, it’s cheat day people. If you want a brownie made with real sugar, make it with sugar and don’t feel bad about it. I kept the butter, eggs, and pretty much everything else the same.

This particular recipe is one of the richest I’ve ever TASTED, much less made. Which is great for me – in all honesty, I’m done after one itty bitty square.

I found this recipe on Joy of Baking, and they had some REALLY good tips on how to keep the recipe really thick and fudgey, just how brownies should be. Apparently the less air you let into the batter, the better. Which means shelve that electric mixer people, get out the wooden spoon and channel your inner pilgrim.


Fudgey Cheesecake Brownies

Adapted from Joy of Baking

Makes 16 brownies

Fudge Layer

1/2 c. butter, cubed

4 oz unsweetened baking chocolate (the better the quality, the better it will taste!)

Scant 1 c. Coconut Palm Sugar (or regular white granulated sugar)

1 tsp. pure vanilla extract

2 large eggs

1/2 c. flour (I used all-purpose, but you could try spelt to up the nutrient factor)

1/4 tsp. salt

Cream Cheese Layer

8 oz Neufchatel Cheese (reduced fat cream cheese)

1/3 c. sugar (if watching sugar, add about half and taste for sweetness, you can get away with using less)

1 tsp pure vanilla extract

1 large egg

Preheat the oven to 325 and spray a 9×9 pan with cooking spray.

Make the fudge layer: In a double boiler (or a glass bowl set atop of a large pot of boiling water), melt the butter and chocolate together until smooth. Remove from heat, and use a wooden spoon (no electric mixers, people!)  to beat in add sugar and vanilla. Once incorporated, add eggs one at a time and beat thoroughly after each addition. Thoroughly as in, your arm should hurt. Count it as part of your workout.When ready, the batter should be smooth and glossy. Remove 1/2 c. batter and set aside. Pour the remaining batter into the prepared pan.

Make the cream cheese layer: Use a hand mixer (briefly!) to cream the cream cheese, sugar and vanilla together. Now bust out that wooden spoon again – you other arm deserves some love, too! – and beat the egg into the cream cheese mixture. Pour the cream cheese layer over the fudge layer and use a spatula to even out the batter so it cooks consistently.

Dot the cream cheese layer with small spoonfuls of reserved fudge layer (I used about 9). Then use a knife to swirl the top layer of the two batters together. Pretty much no matter what you do this will turn out looking pretty – I am the least artistic person ever and mine still looked all fancy-like.

Bake in preheated oven for about 25-40 minutes.  After about 30 minutes, check on them every 5 minutes or so to make sure they’re not getting too brown. This can be a little tricky the first time, I normally like my brownies super moist so I tend to undercook them. But since this recipe is really super moist by nature, I ended up having to put mine back in the oven because they were, quite literally, still batter in the middle. Basically, you want the edges to pull away from the sides, and the cream cheese layer to be golden brown. If the middle is still jiggly when you take it out of the oven, it needs more time. You’d have to seriously overcook these to dry them out.

Let the pan cool about 15-20 minutes, and then transfer to the fridge for a couple of hours. If you try and cut these warm, you’ll make a giant mess. I know this from experience.Use a SUPER sharp knife to cut them, once completely cooled in fridge. I usually cut mine in 4×4 rows, which makes 16 total brownies (yep, I passed math, people.)

(I’m not posting the nutrition facts on these because it’s cheat day, and you shouldn’t feel bad about it! If your curiosity is really burning, send me and email at downtowngirldallas@gmail.com I can give them to you.)

Tagged , , , , ,

Buffalo Chicken Salad


My taste for Super Bowl-y goodness did not end when the Giants (depressingly) stomped the Patriots into the ground. As a matter of fact, I’ve been trying to figure out how to use up the leftover wing sauce I bought for my looked-really-awful-but-thankfully-tasted-really-good buffalo chicken tenders.That is, good if you wanted to literally light your ass on fire.

A few weeks ago on my cheat day (more on cheat days in my next post!), I was craving wings. Big, fat, sauce-soaked drumsticks. And nothing else would do. Since we were in the area, I dragged BF to Pluckers before I turned into a wing-crazed madwoman.

We ordered a few different flavors, but I remember we thought the hot was really good, the perfect amount of spice and flavor. So when I decided to make little mini buffalo chicken bites for the Super Bowl, I trotted on back and bought a bottle of their sauce.

I don’t know what happened between the two times I had this sauce, but when I made those mini chicken bites, they were BRUTAL. Noses were running. Tears were shed. Prayers sent up. Milk demolished. It was insanity. I ate one, cried a little, then about 20 minutes later when the deathfire subsided, I went back for more. Repeat misery.

For some reason, maybe self-torture, I kept the rest of this stuff. I was convinced I would somehow use it in a way that made the food at least halfway edible. I’d eaten it once, I could do it again. And thankfully, all it took was a pile full of lettuce, veggies and a heaping helping of Skinny Girl Ranch. Buyers remorse, be gone!

You can use whatever store-bought hot sauce you like, or make your own with Frank’s Red Hot (they recommend using butter, but I’m sure you could get around that somehow). The nutritionals I calculated for my version used the sauce I bought, so yours might be slightly different. This is definitely a meal salad, it’s really hearty, packed with a bunch of veggies and a wallop of flavor. BF and I were both stuffed by the end of it.


Buffalo Chicken Salad

Serves 2

(2) 6-oz boneless, skinless chicken breast

2 tbsp wing sauce

1 romaine lettuce heart

3/4-1 cup cherry tomatoes, halved

2 carrots, grated (or about a heaping 1/2 c. shredded carrots)

2 stalks celery

about 1/2 oz blue cheese crumbles (optional, if you like the mixture of Ranch and Blue Cheese together, some don’t)

1/4 c. Skinny Girl Ranch


Preheat the broiler. Season the chicken breasts with salt and pepper, and broil 10 minutes per side. Set aside to cool for about 5 minutes while you prepare the rest of the salad.

Chop up the lettuce (I normally just run through it crosswise with a knife), dice the celery, halve the tomatoes and grate the carrots. Add all the ingredients to the bowl, and add blue cheese crumbles if desired.

Once the chicken has cooled, dice into about 1/2 inch squares and toss in a bowl with wing sauce. Add chicken to salad, top with Ranch and toss with tongs.


Nutritional Facts

1/2 recipe

Calories: 334

Fat: 10.2g

Sat Fat: 4.5g

Tagged , , , , , , , ,

The Desperate Downtown Girl – Somewhat Edible Frozen Meals

I hate to admit this. I REALLY do. But sometimes, I get desperate.

Maybe I had to work late, maybe I was so sore from a workout (ahem, two power yoga classes back to back – ouch) that I could barely lift a water glass much less a skillet. Maybe I didn’t get to the grocery store. Maybe BF brought home a stray dog, or talked me into a nightcap at City Tavern (Evil BF! Evil!). But regardless of the reason, sometimes you just have no viable options to take to work the next day.

I try to always keep some Skinny Girl Ranch, a couple of bags of pre-washed spring mix, and a few plain grilled chicken breasts in the fridge for these Downtown Girl-mergencies. While not exactly groundbreaking, an easy grilled chicken salad with a few veggies thrown in is a perfect work lunch in a pinch. But, as luck would have it, my conundrum was this:

“I always give myself very good advice, but very seldom follow it.”

As I was scrambling like a chicken with its head cut off to get out the door this morning, I opened the fridge to find, well…nothing. The last bag of salad had wilted thanks to my cheap ass buying some sub-par gallon baggies (I refuse to admit this was user error). I forgot we had used the last of the grilled chicken on some flatbread pizzas, and alas, there was only about a tablespoon of Skinny Girl Ranch left. DAMN YOU ADDICTION TO BABY CARROTS!

So I was stuck. Already running late, still needing to take the pup to daycare and looking at back to back meetings all day, I had to rely on my last resort – the stash of frozen meals I had in the office fridge.

Now, I normally avoid these like the plague – they’re filled with sodium (although it seems recently they’ve gotten slightly better), and most of them are about as tasteless as prison cafeteria glop, with a portion too small to fill up a baby bluebird. BUT, on a day that was as busy as mine was looking, it’s certainly a better option than turning into a raving hunger beast in the middle of a 2pm meeting and leaving a bloody rampage in your wake trying to aquire a 700-calorie a slice pizza place downstairs. Desperate times, people. Desperate times.

While I’m no frozen food aficionado, I’ve certainly found some of these are better than others. So in case you need to have an emergency stash like I do, here are a few suggestions for meals you might at least halfway enjoy.

  1. 1. Lean Cuisine: Chicken in Peanut Sauce


I was not expecting to like this, but this one actually really surprised me. The flavor was pretty good (though more thin/watery than a normal peanut sauce) and while I could have gone sans noodles and just doubled up on the veg, it’s still one of the better ones I’ve had. So much potential, in fact, I’m in the works of re-creating it from scratch. Stay tuned, people. Stay tuned.

2. Lean Cuisine: Chicken Potstickers


Don’t be fooled – there’s two different versions of these. There’s the kind that steams in the bag with a bed of veggies (WINNER!) and the kind that comes in the sad little tray with flavorless rice (BOO!). The steamer pack comes with 4 potstickers, the other one only comes with two.

The sauce on this one is actually not bad, pretty flavorful and the consistency is nice. It may have something to do with the fact that it’s steamed in a bag, I dunno. The whole frozen-food thing is kind of a mystery to me.

Regardless, this is definitely one that I grab when I can tell the coming week is going to be hellacious. Work freezer staple.

3. Weight Watchers Smart Ones: Spaghetti and Meat Sauce


It was actually a bit of a fluke I even picked this little guy up. I was working late, made it to the local “grocery store” (it’s really more like a glorified 7-11) with about 10 minutes to spare. I needed to get some bagged salads, veggies and fruit for the work fridge, when I realized my freezer rations had depleted. Since this particular grocery store marks everything up about 3 times the price of a regular market, I basically grabbed the first thing I found that wasn’t breaded. First rule of thumb,  NEVER grab something breaded. Grodiepants.

You’d think Spaghetti and Meat Sauce would be hard to screw up, and for the most part you’d be right. That’s why it’s kind of the go-to in the diet freezer world. But this one was actually REALLY good. I will caveat that I added one of those little packets of crushed red pepper and Parmesan that was left over from the last pizza day, but regardless it was pretty good.

I think it was something about the pasta – it was thicker, maybe or it still seemed al dente as oppose to the mushy mess of most of these things. It was certainly a pleasant surprise.

4. Healthy Choice Top Chef Cafe Steamers: Chicken Linguine With Red Pepper Alfredo


I’m in marketing, so I’m pretty skeptical about how much any of the “Top Chefs” had to do with creating this line of meals – especially since many of the same flavors existed before the partnership. (Oh, you think I didn’t notice Healthy Choice? Muawhahahahahaha!). This one may have been around before, but I just hadn’t seen it. As a general rule I don’t normally do cream-based sauces like Alfredo, but this one looked a little bit lighter than the norm. Also, I feel like the Cafe Steamers I’ve gotten in the past tend to have a little bit more food than some of the other brands – but that could just be my mind playing tricks on me.

I really do like the “steaming tray” thing that Healthy Choice does. I tend to like my veggies pretty crunchy so most of the time I undercook them by about 30 seconds. In this case, it still heated everything up so there were no cold spots, but kept the broccoli from being soggy. Score! This definitely goes in the “NOM-NOM-NOM” column – the sauce was light and had a good flavor, everything worked together pretty well. I’m actually trying to make a homemade version using the same flavors to see how that turns out.


5. Weight Watchers Smart Ones: Chicken Enchilada Suizas


Back in the day, I USED to really like the Lean Cuisine Chicken Enchilada Suizas. Then I had some personal things happened that made me fall off the healthy eating wagon, so to speak. Life: 1, Downtown Girl: 0

But, thank goodness I finally climbed aboard again. But for some reason, when I went back, it tasted…weird. Me no likey. The rice was SUPER bland and flavorless, the sauce was watery and bland as well, the whole thing was just…blech. Maybe it had always been that way, or maybe they just reformulated it. I dunno. But I stopped getting them.

After the Smart Ones Spaghetti with Meat Sauce success, I thought I’d test the waters with another. This was the first one that caught my eye, mainly because of my former affinity for the LC version, and the fact that this one came with TWO enchiladas instead of one. Say what?! I’m in. But I must say, I didn’t have high expectations.

This one was definitely a winner. The sauce was thick and flavorful – although it’s labeled as “sour cream and green chile sauce” it tasted kind of like a queso. the meat didn’t taste over-processed, and while there wasn’t very much rice, what little there was seemed to be pretty flavorful. Winner winner Chicken Enchilada Suizas dinner.

6. Michelinas Lean Gourmet: Buffalo-Style Chicken Snackers/Pepperoni Pizza Snackers


Have you ever said to yourself,  “Damn I could really go for some Totino’s Pizza Rolls right now?” Oh, don’t lie to me. The moments may be few and far between, but you’ve had them. Those guys are a total diet fail. And while Michelina’s version is far from being considered ‘healthy,’ they’re about half the calories and 1/3 of the fat of the kind you loved as a kid. And honestly – they taste the same. To me, at least. Break out some Skinny Girl Ranch and you’ve got yourself a perfect Movie Night snack. And really, they’re almost filling enough to be a whole meal. Fill up on some rabbit food and you’d probably be good to go till morning time.

Tagged , , , , ,

Not-So-Guilty Whole Wheat Cheeseburger Mac

I been slackin’, yo.

Yes, it’s true. Not only did I have a super cool (read: extremely un-sexy, and worthy of an pirate patch) eye situation, but work has been INSANE for the past two weeks. I’ve pretty much been sustaining of black coffee, hummus and veggies, frozen Lean Cuisines-type meals (GASP!) and bagged salad. It hasn’t been pretty, folks. It hasn’t been pretty at all. *shakes head in self-disappointment*

But, I’m finally back on track! And not to mention, raring to go with a ton of ideas in the good ‘ol steel trap. But yesterday, the first day in recent memory I wasn’t working literally from 9 am to midnight, I just knew BF and I deserved some SERIOUS comfort food.

I’ve tried to create a skinny version of Mac and Cheese for a while now, and it always turns out kind of, well, blah. So when my mom called and said she had come up with a truly decadent but not-so-guilty version, I had to give it a try.

I switched up a few things and added meat to make it more of a main dish. I also added a bread crumb topping because I love the crunchiness vs. creaminess.

Now, keep in mind, it’s still mac and cheese. So while the calorie count IS under 400, it’s got some fat. But compared to Hamburger Helper (blech!) or rue-based mac and cheeses, this is a way, WAY better alternative. After all, you have to jump on the mac and cheese train every once in awhile. This is America, people. We like cheese.

And while I’m on the subject of cheese, unless you can find EXTRA sharp reduced fat cheddar, use the full fat kind. The reason all my previous recipes turned out tasting like watered down cheesy styrofoam was because I was trying to cut fat and calories with either fat free or reduced fat cheese. The consistency is all wrong and the flavor is just, well…off. You can try and use it if you absolutely must, but I’ve never had a good experience with it.


Not-So-Guilty Whole Wheat Cheeseburger Mac

Serves 6

1/2 lb whole wheat shells or elbow macaroni (half the box of dry)

10-12 oz extra lean ground beef

1 tsp Montreal steak seasoning (or to taste)

1 10.75-oz can Campbell’s Healthy Request Cheddar Cheese Soup

3/4 c. good quality extra sharp cheddar cheese (I used Cabot)

1/2 c. fat free or reduced fat sour cream

1 tsp dry mustard

1/4 tsp. garlic powder

1/4 c. plus 2 tbsp Parmesan cheese, divided

1/4 c. whole wheat Panko bread crumbs

1 tbsp olive oil

Cooking spray


Preheat oven to 350 and spray a baking dish with cooking spray. I used an deep oval dish, but an 8×8 pan would work as well.

Boil water for pasta in a large covered pot. While water is boiling, coat a skillet with a generous amount of cooking spray and heat over medium-high. Season the meat with Montreal steak seasoning, to taste, and add to skillet. Let one side brown for about 3 minutes before breaking up the meat with a potato masher or wooden spoon. Continue cooking for a total of about 10 minutes, or until meat is cooked through. Transfer meat to a paper-towel line plate to drain and pat off any extra grease.

Once water is boiling, salt it and cook pasta according to package directions. I normally cook whole wheat pasta a little longer than the package recommends – I find it gives it a slightly softer, less grainy texture more reminiscent of regular pasta.

While pasta is cooking, combine soup, cheddar cheese, sour cream, 2 tbsp Parmesan cheese, dry mustard and garlic powder in a medium sized bowl. Mix well. Once pasta is cooked, drain well and add to cheese mixture while still warm. Add meat and stir to combine. Transfer mixture to baking dish.

In a small bowl, combine remaining Parmesan cheese, Panko and olive oil. Combine with fork until most of the crumbs are moist. Sprinkle crumbs on top of pasta and bake for about 30-35 minutes, or until the cheese is bubbly.

This keeps well in the freezer – put it in baggies in individual portions and add a side salad for a quick, easy lunch during the work week.


Nutrition Facts

6 servings

Calories: 325

Fat: 21g

Sat Fat: 10g

Carbs: 10g


Tagged , , , , , , , , , ,

Spinach, Mushroom and Goat Cheese Omelet

The omelet is my nemesis.

I tried every omelet method under the sun, and it always ended up a half-runny, sad looking lump of ingredients. Still tasted good, but it certainly wasn’t pretty. As a matter of fact, it usually turns out something like this:

Whomp, whomp whommmmp.

I figured there had to be a better way. So I Googled and YouTubed until I found a method that finally made the light bulb go off in my head. Use the broiler.

Using the broiler to cook the top of the omelet eliminates the need to actually flip the thing, which is where all my problems begin. I have no finesse with the flip. And the worst part is, I always get about halfway there and then it tears, or breaks, or I burn myself and accidentally knock the pan on the floor. Omelets are evil.

But, the broiler method is foolproof. And if I can do it, you can do it.

Of course, you can use this method and fill it with anything you want. But this was my particular creation this lovely Saturday morning.

Spinach, Mushroom and Goat Cheese Omelet

Serves 1

2 egg whites

1 whole egg

1-2 tbsp skim milk

Kosher salt and pepper, to taste

1/4 c. frozen spinach, thawed and drained

1/4 c. chopped mushrooms

1/4 c. red onion

1/2 oz. goat cheese (about 1/2 inch slice)

Cooking spray

Preheat broiler to high.

Place eggs in a bowl, add milk and season with salt and pepper. Now whisk as if your life depends on it. Scratch that – whisk as if Gerard Butler’s life depends on it. (Can you really imagine a world without King Leonidus? I can’t.) Basically, you need to whisk a bunch of air into the eggs to keep them light and fluffy as they cook.

Spray a small non-stick skillet with cooking spray and heat over medium/medium low heat. I put my stove on at about a 4. Pour egg mixture into pan, and cook until the edges are firm and the top of the eggs start to bubble slightly. The top will still be runny.

Add the spinach, mushrooms, onion and goat cheese evenly on the top of the eggs.

Place the skillet under the broiler for about 2 minutes until the top of the eggs firm up and goat cheese melts slightly. Remove from broiler, loosen edges with a spatula and transfer to a plate.

Nutrition Facts

1 omelet

Calories: 185

Fat: 8g

Sat Fat: 3.5g

Carbs: 8g

Tagged , , , , , , , , ,

Lemon and Thyme Couscous

If you haven’t noticed, I don’t normally post a lot of carb-heavy recipes. No, I’m not one of those crazy people who runs screaming from a package of saltines, or holds up a crucifix against a baked potato. As a matter of fact, I LOVE carbs. I’m the queen of carbs. I want to fill a pool with pasta and French bread and eat my way through it. And it will be awesome.

Unfortunately, carbs hate me. Actually, I take that back. They’re quite fond of my love handles.

But, I’m a big believer in the whole ‘everything in moderation’ theory. If I’m really jonesing for some of the good stuff from the bottom of the food pyramid, I’ll just go ahead and make it.

I do a lot of yoga (I try to go to the studio 3-4 times a week and practice at home at least once a week), which means I sweat a lot. I also drink about a crapton and a half of water. And strangely, although carbs are my illicit lover, I normally crave more proteins and water rich foods. So, when the little carb monster hits, I throw him a bone. Or in this case, a little couscous.

I was trying to find something to go with My Big Fat Greek Chicken, and since couscous tends to pick up flavor easily I thought I’d tie it together with a little lemon juice and one of my FAVORITE herbs of all time, thyme. (See what I did there? See it?)

This is a super simple recipe, especially if you use the fast-cooking kind (I normally use Near East). I’m not much for the flavored ones, they’re packed with sodium and really it’s just so much easier and much more fresh it you flavor it yourself. Just get the plain stuff and toss in whatever your little heart desires. In this case, it desired some lemon-y, thyme-y goodness.

I used a chicken bullion cube, but feel free to sub vegetable stock or even plain water to make this vegetarian/vegan.

Lemon and Thyme Couscous

Serves about 5

1 10-oz box Near East Original Plain couscous

2 cups water

1 tsp Better than Bullion – Chicken

zest of 1 lemon

juice of 1/2 lemon

about 1 tbsp fresh thyme (I wouldn’t use dried here, it changes the taste)

1/4 tsp garlic powder

about 1 tbsp olive oil

Kosher salt and pepper, to taste

Cook couscous according to package directions (omit any olive oil or butter called for). If using, add bullion when the water is boiling and allow to dissolve before adding the couscous.

Once couscous has set, fluff with a fork to separate grains. Add olive oil, lemon zest, lemon juice, thyme, garlic and salt and pepper to taste. Use fork to distribute ingredients evenly (I found that using a spoon leads to clumps).

Nutrition Facts

1 heaping 1/2 c. serving

Calories: 182

Fat: 2.5g

Sat Fat: less than 1g

Carbs: 34g

Tagged , , , , , ,

Tzatziki Sauce

I may write for a living, but I cannot for the LIFE of me remember how to spell Tzatziki. As a matter of fact, I just had to Google it so I didn’t spell it wrong and seem like an uninformed ass. And yes, I had to glance to make sure I just spelled it right, just then. Le sigh.

But, what I DO know about Tzatziki is that it’s yummy yummy in my tummy, mmm mmmm good. And – BONUS JONAS! – relatively healthy to begin with.

I’m sure ‘traditional’ Tzatziki (got it, BAM!) doesn’t use fat free Greek Yogurt, and they probably get all fancy pants and do things I couldn’t possibly know about as a non-Greek twentysomething. But, this stuff tastes pretty darn close.

You can serve this with just about anything Greek-inspired – gyros, veggies, pita bread/chips, etc – but I made it specifically to top My Big Fat Greek Chicken. Thankfully though, I made way too much and now I have leftovers for work snacks. Yay me!


Tzatziki Sauce

Makes about 1 c.

8 oz. plain, fat free Greek yogurt

1 cucumber

1 tbsp olive oil

about 1 tbsp fresh lemon juice (or more, to taste)

1 tbsp chopped fresh dill, or heaping tsp dried dill

3-4 cloves garlic

Kosher salt and pepper

Grate the cucumber using a box grater. Gently squeeze a small amount of water out of the grated cucumber with a paper towel. (Leave a little of the moisture in and it will thin out your sauce with cucumber-y flavor.)

Throw everything in a bowl and combine. I used a whisk, but if you wanted a smoother result I’m sure you could use a blender or food processor. Let sit for about an hour to let the flavors blend.


My Big Fat Greek Stuffed Chicken

Opa, bitches!

I was feeling uninspired. It was the first day back from a 3-day weekend, I had spent the good majority of the day catching up. By the time I realized I might need to figure out what the heck I was going to make BF and myself for dinner, it was after 6 and I still had to stop by CVS, the grocery store AND do laundry (BF got in a fight with a bottle of mustard, and it won).

So I turned to my newest food-based obsession – Pinterest. I get countless ideas for recipes on Pinterest, some that I can try out as-is and some great ideas for stuff I can skinny up to fit Downtown Girl standards. But, I was in no mood for reinventing the wheel (or say, a healthy version of Mac & Cheese – it’s an undertaking) so I needed to find something that was relatively healthy to begin with.

I had no idea what I was in the mood for, other than 1) easy and 2) cheap (BF and I are saving up to move to some new digs, holla!). And, you guessed it, I had some chicken I needed to cook up. So I poked around the likes of BBQ Chicken Pizzas, Chicken Fajitas, some sort of Chicken in Foil creation that looked ridiculously sinful until I found a picture of Rachel Ray’s Lazy Baked Greek Chicken.

Am I lazy? Yes. Do I like Feta Cheese? Yeppers. Do I ALWAYS have a couple packages of frozen spinach in the freezer? You betcha. And most of all, did I want to take out the day’s frustration on a piece of chicken with a rolling pin? Damn straight.

The basic idea for the recipe is the same, but I did make a few changes. I changed the method of how you stuff the chicken. I’ve never really gotten proficient at this butterfly-ing-to -fill technique. Plus, I just like hitting stuff with rolling pins. So there’s that. I nixed the breadcrumbs and made a quick Tzatziki Sauce to top it with. I threw in some Kalamata olives for BF since he’s an olive freak, but left it out of mine. Also, I added a little lemon juice to the filling, because really, what’s Greek food without a little lemon juice?

The result was a tasty treat that seemed like it took a LOT more work than it actually did. Downtown Girl: Mission Accomplished.

If you’re under your calories for the day, or need some carbs after a long workout, try it with Lemon and Thyme Couscous.


My Big Fat Greek Stuffed Chicken

Serves 4 (great as leftovers!)

Adapted from Rachel Ray’s Lazy Baked Greek Chicken.

3-4 boneless skinless chicken breasts (18 oz total for 4 servings)

1/2 medium yellow onion, diced

3-4 cloves garlic, chopped

1 10-oz package frozen spinach

1 1/2 tbsp fresh lemon juice

1/2 c. Feta cheese (or Reduced Fat Feta)

Handful pitted Kalamata olives, chopped, about 5-6 or to taste (Optional)

Pinch grated nutmeg

Salt & pepper, to taste

Preheat oven to 425.

Spray baking dish with nonstick cooking spray. If spinach is still frozen, put it in the microwave on defrost while preparing the chicken.

On a plastic cutting board, place chicken breast underside up and cover with a bit of plastic wrap. Proceed to beat the crap out of it with a rolling pin, until it’s a uniform thickness of a little less than half an inch. Repeat with remaining breasts.

Sidenote: Try to remember to put the rolling pin down before you answer a knock at the door. Finding a crazy-eyed, rolling-pin-wielding woman behind door number one is not good. It scares people.

Coat a nonstick skillet with a generous amount of cooking spray. Saute onion and garlic over medium heat, about 5 minutes. Transfer thawed spinach to a dishtowel and ring out all the extra moisture. Combine spinach, feta, lemon juice, olives (if using), sauteed onion and garlic, a pinch of nutmeg and a fresh cracked pepper in a bowl.

Season the underside of each chicken breast with salt and pepper, fill each with spinach mixture and fold over. You can use toothpicks to secure if you wish, but mine fit snugly in an 8X8 Pyrex so it wasn’t needed. Arrange in coated dish, and season the outside of the chicken with salt and pepper. Bake for about 25 minutes.

Serve with Tzatziki Sauce and/or Lemon and Thyme Couscous.

Nutrition Facts

1 (6-oz) serving

Calories: 220

Fat: 6g

Sat Fat: 3g

Carbs: 7g

Tagged , , , , , , ,

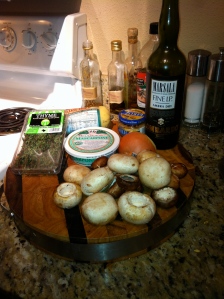
Mushrooms with Marsala and Mascarpone

Let’s get one thing straight. I’m no vegetarian. I’m not sure if you could tell by the excessive amount of chicken recipes on here, but I’m a big fan of meat.

And, I’m a Texan, so you know I absolutely require a big ass juicy steak every now and then.

But, I did have a phase where I went (GASP!)…vegetarian.

It wasn’t based on any kind of political agenda, or really an agenda at all. I’ve been practicing yoga on and off for about 5 years now, and a few years back I participated in a program where you commit to practicing yoga at least 6 days a week for 30 days. Part of this consisted of eating clean, of course, but there was no set meal plan. Even so, with all the sweating I was doing I found myself craving pretty much nothing but water-rich fruits and veggies.

I think I went a maybe 5 or 6 days without eating meat until I realized I was even doing it. Then, I sort of said to myself, “Huh. Wonder how long I could actually do this…”

And so I did. And to be perfectly honest, it wasn’t really all that difficult. I think I lasted about 3 months before I caved. And while I’ve been back on the yardbird for awhile now, every so often I like to throw one of my old vegetarian dishes in my meal rotation. Such was the case last night.

The thing about vegetarian meals is to make them filling they need to be rich and hearty. Which is totally doable. And mushrooms were some of my favorite.

This recipe is sort of like a ragout, and usually I serve it over Crispy Polenta. If you want to make it non-vegetarian you could always use this as a sort of mushroom sauce over a simple grilled chicken breast as well.


Please excuse the crappy photography – I’m dealing with a cell phone camera here. Working on getting a new camera soon!


Mushrooms with Marsala and Mascarpone

Serves 2

About 1 lb mushrooms, sliced (mixture of button, cremini, and/or any others you can find, really)

1/2 large onion, diced

3 cloves garlic, chopped

1 tbsp olive oil

1 tbsp fresh thyme

1/4 c. Marsala wine

2 tbsp Mascarpone cheese

Kosher salt and pepper


Heat olive oil in skillet over medium heat. Add onion and garlic and cook about 5 minutes, until onions begin to turn translucent. Add sliced mushrooms, turn heat up to medium high and season with salt, pepper and thyme. (Normally you wouldn’t salt mushrooms as they cook since they release all their moisture, but that’s actually what we want here.) Allow to cook down about 10 minutes. If the mushrooms are looking too dry or sticking, hit it with a couple short bursts of cooking spray.

Deglaze the pan with Marsala and scrape up and bits stuck to the bottom. Allow to cook for about 3-4 minutes until wine reduces slightly. Turn heat down to medium low and stir in Mascarpone. Taste and adjust seasonings accordingly.

Serve with Crispy Polenta.


Nutrition Facts

1 serving (half of recipe)

Calories: 203

Fat: 13

Sat fat: 4.5

Carbs: 13


Tagged , , , , , , , ,

Bacon Wrapped Dates with Goat Cheese

Oh you fancy, huh?

Well I am certainly not fancy. Not today at least. You could believe me, or you could see me draped in a knitted afghan a la Snuggie informercial and wearing BF’s stretched out beanie in a feeble attempt to keep warm in my sub-zero office. No. I’m certainly not fancy today.

But this recipe sure is! Wooohooo! As a matter of fact, it’s not something I would ever have thought of on my own had I not seen a version of it at a fancy restaurant the other day.

Generally, I’m not big on mixing fruit and savory. Or fruit and chocolate (strawberries notwithstanding – I’m not that crazy, people). I like my fruit to taste like fruit. But maybe I’m just a weirdo.

But, at a fancy birthday lunch the other day, the table ordered an appetizer that blew my ever-loving mind – Bacon Wrapped Dates stuffed with Chorizo.

If you don’t know what Chorizo is, it’s a super fatty Mexican-style sausage that has what I like to call The Curse of the Red Death. No matter how I try to cook it, the stuff is covered in horrible red grease that freaks me out so bad I normally just toss the stuff. No human should eat something that produces that much grease. Yikes.

But, curiosity killed the cat, so to speak, and I tried one. And hot damn it was DELICIOUS! So delicious I ate a second one, and then another half someone stranded on the plate. (For shame, sir. For shame.)

Seeing as I basically killed my calories for the meal in the span of 3 bites, I harrumphed through the rest of lunch with a dry salad and some sad-looking vegetable soup. But still, it was worth it.

I don’t normally keep dates at the house, but I had a recipe the other day that called for them so luckily had some on hand. And seeing as Red Death Chorizo doesn’t make it past my front door, ever, I had to stuff ’em with something else.

Remember when I got that goat cheese on sale? Yeah, well I went back and got two more packages. Problem solved. Sweet, salty, earthy. Mmmm Mmmm Gooooood.

I didn’t take a picture of these because they were gone before I got a chance to take out my camera. If that’s not recipe success, I don’t know what is.

Bacon Wrapped Dates with Goat Cheese

Makes 9 Dates

3 slices Center Cut Bacon, cut into thirds

9 sweet dates, pitted

1 oz goat cheese

Cooking spray


Preheat oven to 400.

Coat a cookie sheet with cooking spray. Stuff each date with goat cheese crumbles and wrap with 1/3 slice bacon. Use a toothpick to secure. Place seam side down on prepared baking sheet.

Bake about 5 minutes, then flip dates and bake 5-6 minutes more, or until bacon is crisp to your liking.

Nutrition Facts

For 1 Date

Calories: 39

Fat: 1.2

Sat Fat: .5

Carbs: 6.3

Tagged ,